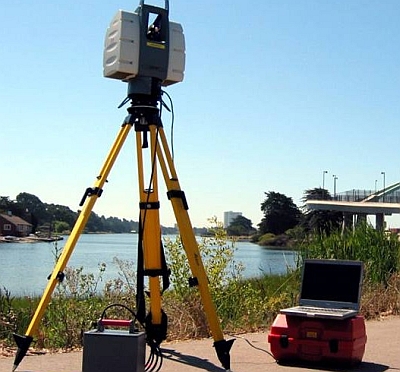
Scan to BIM: The evolution of scanning technology
The truth is, scanning is the only cost-effective way to collect the existing world.
You simply can’t go into a cathedral, petroleum refinery, or metropolitan multi-use entertainment facility and measure with rulers and expect to get the accuracy you need to confidently design renovations.
Laser scanning is the only way to do it.
Up until recently, BIM users would take a set of “asbuilt drawings” put them into a 3D modeling program and create a computer model to work from. Now, after several years of doing that, the harsh realization has surfaced that there are many discrepancies between the “record drawings” and the actual environment to be constructed.
If it’s sheet rock and wood, it can be adjusted to fit. But if it’s glass, steel, concrete or mechanical equipment, a seemingly small error can grow very costly as it is much harder to warp and bend. (Putting expensive new equipment into an area that is too small is a nightmare for the installer, designer, engineer and the insurance company.)
These new 3D laser scanning technologies have dramatically changed the surveying industry – and they have changed it fast. But to really understand the evolution, let’s take a step back….
2004: 360-Degree Scans
The first 360-degree scanners came onto the scene around 2004. Before that, if you wanted to scan something above your head, you had to tilt the scanner back and scan at a steep angle, as most only had a 120-degree scan ability on the vertical axis. Several companies came out with full straight scanners about this time that made it much easier.
2006: Time-of-Flight Scans
The next evolution was time-of flight scanners. In 2006, a time-of-flight scanner took about 45 minutes to one hour for a complete 360-degree scan. If you could do 8-10 scans a day, you were doing very well. Today, the same can be done in about 12-15 minutes, depending on the density you want a scan.
At our firm, our first scanning projects were roads. In a very complicated area, we would scan 1”X 1”. The time-of-fight scanners back then could collect 4,000 points per second. Now they can easily collect 50,000 points per second!
2008: Phased-Based Scans
Today’s phase-based scanners collect 2,000,000 points per second and can create a ¼-inch x ¼-inch pattern at a distance of about 100 feet. This is incredible and as fast and dense as the average user needs. The hardware will eventually get better, faster and cheaper, but phase-based scanning is effective, stable, and provides the ability to scan almost anything in a reasonable about of time.
Present: Scan to BIM
Today, the big research money is going towards Scan to BIM technology, which converts billions of points in the point cloud into useful data.
Several companies have begun addressing this including small independent companies like Pointools, which came up with a way for scanners to recognize flat surfaces. (As small as this may seem, it is a huge advancement.) The program will also recognize pipes and model them automatically about 50% of the time. (Another major advancement.)
Now many of the pipe programs are getting to the same place and advancing the ball. Currently, we are at what I call the “Model T Ford” in software programs, but every year the programs get better.
The next evolution
Having now scanned may very complex areas in industrial sites, we have had a chance to compare them to the asbuilt drawings. In the horizontal view, they are generally close geometrically to the actual. But in their vertical axis, the pipes and duct work in the asbuilt drawings are rarely correct.
There are many reasons for this, but most often it is because the process is so difficult that when an installer sees an easier path, he generally takes it.
“Record drawings,” or asbuilt surveys, are rarely done after the work is complete. Typically, the conversation goes something like this: “Here are the design drawings. Redline any changes that you made.”
There is not a lot of motivation to do a totally new survey. But if a design team takes these documents and models them into their computer programs, they are unknowingly creating multiple problems for the contractor on the new job.
We recently took a set of asbuilt documents for a complex project, modeled them and then compared them to the point cloud to do a clash detection to determine potential interferences. The outcome was eye opening.
Few of the pipes, ducts, waterlines or fire lines in the ceiling were in the place shown on the record drawings. If these documents had been used, the MEP contractors would have spent ten times our fee “field fitting” the new utilities inside the old.
With the utility and cost of laser scanning, it would be smart to use one on every renovation project. If for nothing else, insurance! Just one field fit can sometimes cost far more than the scan itself.
If you scan the environment and put the proposed design into the point cloud, you can tell in just a few minutes where the major interferences will be. We have found conflicts that would have taken upwards of $100,000 to fix if they had to be field-changed during construction. Some were fatal flaws in the required design clearance that could not have been achieved and a totally new design would have had to been submitted.
Scanning to BIM is a big and extremely important step in surveying. Right now, it is the design software that is trying to catch up with the scanning potential. Already this year, several new programs have come out that are much better at accepting point clouds and computer models, but they still have a long way to go.
Not having a design based on a laser scan of the actual environment is a risk that few designers should take. I know I wouldn’t want to tell an owner that there is a construction problem that could have been avoided with a relatively inexpensive laser scan.
Laser scanning has evolved from a “luxury” to a best practice and it’s not a step that any prudent designer should skip.
###
Tate Jones has over 40 years of experience in land and aerial surveying and was one of the country’s earliest adopters of 3D laser scanning technology. A nationally recognized expert in the field of 3D data capture, he has worked with hundreds of clients in the engineering, architectural and construction industries. Contact him at tjones@lasurveying.com or visit www.landairsurveying.com.


Leave a Reply
Want to join the discussion?Feel free to contribute!