Posts

The field scanning process: How to get the best results

Once your laser scan has been ordered, there are some things you can do to prepare for our crews.

First, prior to the scan, have someone (preferably a knowledgeable project manager) onsite to communicate with the scan team when they arrive.

Make sure your plant managers know crews are coming. If there is a local safety course that needs to completed or specific plant instructions, let them know upfront. Also let crews know if there is special gear they may need like moon suits, hairnets, safety glasses or ear protection.

The project walk-through is a very valuable process because this is where we determine the location of the scanner setups. Let crews know what is most important and what is less important. If a major conduit with fiber optics, a power transmission conduit, or particular piece of machinery is important to your project, for example, it is important to let the scanning crew know.

Also make sure the scanning crew has a contact that they can call if they have questions or need clarification mid-scan.

Crews will place targets around the scan area to tie all of the scans together and will remove them upon completion of the site visit. Once they understand the limits and the prime areas of interest, the scanning process will begin.

Though it is great to watch them work, these teams are professional and the less direction they have, the better the results! A typical job can take two days to several weeks. Each night, scanned data for the day will be checked to make sure there are no gaps or geometric issues with the data.

For black and white scan data, the process is simply this: scan, move to a new location, scan, move to a new location, etc. For color data, a set of photographs is added to the process: scan, remove the scanner, add a camera, take seven photographs (six at 60-degrees horizontally, one straight up), move the scanner, take photos at the new location, replace the camera with the scanner, scan, and repeat this sequence throughout the site.

This allows our crews to produce high-quality TrueView files. When they get into a rhythm, the above sequence maximizes efficiency up to 100%.

Post Processing

When the scan data comes back into the office, data is exported from the crew’s field laptop to the desktop. On large jobs, this will take several hours.

Next, if there are color photos, the color photo data is downloaded and registered to the point cloud. This process can take 5-10 minutes per set up. Around 100 set-ups can take 15 hours of technician time. (If there is only black & white data, we skip this step.)

Once the photo data is added to the raw data, the target information is then added to the data set. The data is then run through the final registration process. This program compares the data set to all the other common data sets and produces the final registered point cloud.

The point cloud is then tested visually and geometrically to make sure there are no errors. This is done by cutting it like a wedding cake to see that all of the horizontal surfaces line up and also looking at elevation views and pipe runs to make sure that these are consistent throughout the cloud.

After these are tested, the final registered point cloud is ready to be used. Files are then loaded on to a hard drive and shipped to you, the customer!

Now that you have the point cloud data, what do you do with it?

Registered point cloud data can be exported into AutoCAD, MicroStation, Bentley, Revit, Autodesk Recap and many other computer programs. Designers can then take this data and design and model it in a 3D environment.

A TrueView map of the site showing 3D spherical data in black & white or color can be created. You can measure between points in the point cloud with this free program.

Warning: We always recommend that for precise measurements, you use the point cloud information and not TrueView. The angle of the view can affect the measured distance in TrueView. At a minimum, check the measurement from several different views.

Computer models can also be built in Revit, AutoCAD or MicroStation and delivered to the client. These models can be imported into the point cloud and then “clashed” to see if the new model interferes with the existing point cloud.

Want to learn more? Contact us today to learn if a laser scan is right for your next project.

###

Tate Jones has over 40 years of experience in land and aerial surveying and was one of the country’s earliest adopters of 3D laser scanning technology. A nationally recognized expert in the field of 3D data capture, he has worked with hundreds of clients in the engineering, architectural and construction industries. Contact him at tjones@lasurveying.com or visit www.landairsurveying.com.

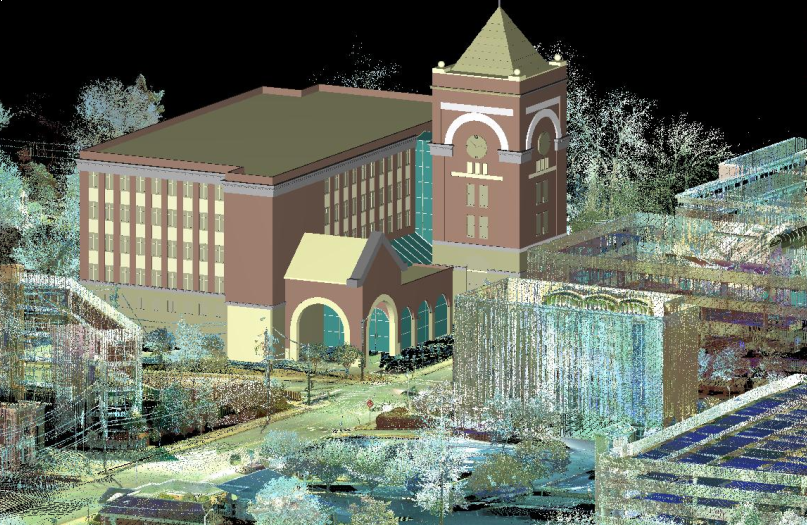
3D Laser scanning helps with job site safety

When most people think of laser scanning, they think of capturing and documenting existing conditions prior to a construction project.


While this is LandAir’s primary use of our laser technology, there are many additional benefits that our clients are beginning to take advantage of from the scans we provide. One of these benefits is safety, a priority for all of us in the construction industry.


Virtual job site

Laser scanning is a great way to incorporate new personnel into an environment. Enabling workers to view a job site prior to physically stepping onto the site is just one valuable resource provided by a scan. 


Whether it is identifying hazards on a site like open pits or high traffic areas, or just identifying where the lay-down areas for supplies will be, the ability to immerse workers into a site can protect them and cut down on miscommunications in the field. 


Visualization can also assist with language barriers that may be present on a site or tradespeople who don’t understand the entire safety plan of everyone onsite. It can also provide “virtual tours” to interested parties or at least help them identify caution areas before walking the site. 


Training

Laser scanning and modeling can also provide virtual training in a 3D space. The ability to identify parts on equipment and look at the space the equipment is in helps workers identify potential hazards and ensure that they have the necessary tools to make repairs or installations. 


There are partner companies today who are putting virtual “how to” training guides online that demonstrate anything from changing a tire to repairing valves in a virtual environment. This virtual 3D training not only allows for repairs and replacements to be done faster, which can save money on shut downs, but lessens the time workers are exposed to the elements. 


Many times, moving machine parts, extreme temperatures and dangerous spaces are involved with repairs or replacements and cutting down time in the field can help get workers out of harm’s way. 


Clash avoidance

Many times on job sites large equipment is present and cranes are erected. Staging these areas and making sure that the equipment has room to maneuver without colliding with anything else on a site is very important. 


Laser scanning can provide very precise measurements of equipment and the surrounding environment prior to being onsite. A crane’s radius can be measured, modeled and dropped into the virtual site to determine where potential clash areas may exist.


Risk management

In the event an accident does occur, having a laser scan of the site allows the team to go back in and examine the area where the accident took place. It may provide a better understanding of how the accident happened and who may have truly been at fault. 


Having a 3D laser scan of the existing conditions may help limit liability and demonstrate an added level of due-diligence. This information could also be used to create a guide for “what not to do” on future sites.


First responders and safety plans

Providing valuable information to first responders is another benefit created by a 3D laser scan.  Demonstrating the fastest and safest routes on a job site is something that can be easily demonstrated with a laser scan.


Floor plans can be developed or access to a web-based viewer like Leica’s TruView can allow 360-degree views of the environment. Evacuation routes can also be reviewed and demonstrated with a fly-through video for workers on the site.


Deliverables

The deliverables for 3D laser scanning that we provide are various and based on the needs of our clients. We provide drawings, models, fly-throughs and TruViews.


Autodesk’s AutoCAD and Revit are the two most popular formats in which we deliver drawings and 3D models. Our 3D point cloud fly-throughs are easily shown in Windows Media and Leica’s TruView allows clients to see our scan set-ups in full 360 views from each station. 


As the virtual world and building information modeling become more prevalent in the construction industry, new uses for 3D laser scanning that provide increased safety on job sites will hopefully increase as well.


###


Mitch Dorsett has over 15 years in the building and construction industry and serves as director of business development for LandAir Surveying. Mitch is rapidly becoming an expert in 3D data capture and virtual design and construction, having attended and represented LandAir’s laser scanning capabilities at SPAR, RTC and Autodesk University in 2012. Contact him at mdorsett@lasurveying.com or visit www.landairsurveying.com.
Five reasons to consider laser scanning in 2013…

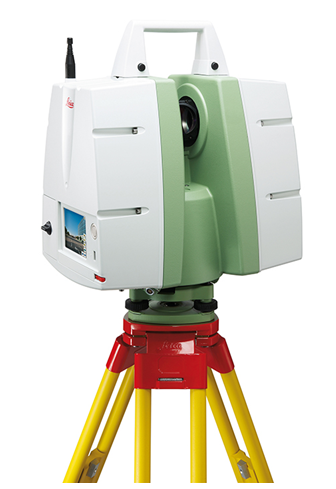
Blog 5 photo c10 scannerI hope you are off to a wonderful New Year! In the theme of the New Year, I continue to be amazed at all of the new applications for laser scanning that our clients are coming up with or projects they inquire about measuring.

Hopefully this blog will inspire you to think of opportunities to utilize our services in 2013 to make your next project even better.

As-built data capture has always been a challenge for the AEC community and owners of assets. The outdated methods of gathering data are time consuming and lack accuracy and utilizing these record drawings can be inexact.

LandAir Surveying uses the latest technologies to help our clients. Whether you are looking for accurate as-built floor plans, historic preservation of a structure or MEP surveys in the plenum of a ceiling, we have an accurate and cost-effective solution for you.

Over eight years ago, we began utilizing the revolutionary technology of laser scanning. Our first laser scans were for the transportation industry, performing bridge surveys. Through these and other projects, we found laser scanning to be superior to traditional methods of data capture for a number of reasons:

#1: They are more precise.

A laser scan takes multiple scans to collect millions of data points. These scans are then registered together to generate a single three-dimensional “point cloud” that can be measured accurately and provides distances and elevations between points on X, Y & Z coordinates.

#2: They are versatile.

Laser scans can produce (when used with digital color photos) survey quality files, fly-through videos, BIM Models and CAD drawings.

#3: They are fast.

A single laser scan can be collected in around six to eight minutes. This enables crews to take many more scans and capture more detailed data than ever before. It also allows for accurate surveys to be done with minimal interruption to building occupants.

#4: They are safe.

Laser scanning provides a safer environment and allows crews to measure in places that would have previously been impossible.

#5: They save you money!

Finally, laser scanning almost always pays for itself. Here are a few examples of ways laser scans can save you money on your next project. Here are a few examples of ways laser scans can save you money on your next project:

  • You can always revisit the original scan multiple times from your computer desktop without the time and expense of traveling to the site again and again. With a laser scan, you can even revisit the site from your desktop years after the initial scan.
  • The quality of data collected can minimize or eliminate the need for construction reworks and field retrofitting.
  • The number of change orders due to erroneous design and unknowns in the field are dramatically reduced.
  • Material waste is reduced and the amount of production in the shop is increased.
  • Coordination between design and construction teams is greatly improved by providing visual documentation for discussion.
  • The speed of design is increased by providing accurate as-built conditions and clash detection.
  • Bid documents can be created from as-built data, resulting in lower-priced bids and a quicker schedule.

As you can see, the reasons for laser scanning are compelling. But what types of projects are best suited for this technology? In our experience, we have seen the greatest return on investment for laser scanning on projects that are complex and difficult to measure. Those projects with precise measurement requirements and a required speed of data gathering typically yield the greatest return on investment.

We have scanned miles of tunnels, airport conveyor systems, MEP structures that look like pipe “spaghetti,” hotel and casino atriums, and theaters and stadium grandstands with thousands of different sized structural beams. Laser scanning was by far the best solution for these projects.

While complex projects are great opportunities to utilize laser scanning technology, other advances in virtual design and construction solutions have allowed us to provide results for less complex environments.

New software and measuring solutions allow us to provide detailed as-built drawings and 3D models for hotel rooms, retail spaces, classrooms and offices with amazing speed and at a greatly reduced cost-per-square-foot over traditional architectural surveys. Field measurements to productions of floor plans and even Revit models can now be delivered in days.

From the industrial, manufacturing and energy sectors to hotels, hospitals and retail spaces – LandAir can provide solutions to make your next project more efficient and affordable.

###

Mitch Dorsett has over 15 years in the building and construction industry and serves as director of business development for LandAir Surveying. Mitch is rapidly becoming an expert in 3D data capture and virtual design and construction, having attended and represented LandAir’s laser scanning capabilities at SPAR, RTC and Autodesk University in 2012. Contact him at mdorsett@lasurveying.com or visit www.landairsurveying.com.

Autodesk University 2012: watching an industry grow up!

Attending and exhibiting at shows like Hexagon, Spar, and Autodesk University is always fascinating because you get to interact with clients all over the country and see what’s new in the industry.

This was our first time exhibiting at Autodesk University, but having been to three conferences in Las Vegas in one year, I was quite familiar with the surroundings. At this year’s show – which was attended by over 8,000 people from 102 countries – what I saw was an industry that has grown up and is beginning to make a real impact on design and construction.

I remember in 1986 when a new drafting program named AutoCad came out and everybody was debating if it would become the standard…it did. And it brought with it – along with the digital age and computers – the plotters and all that went with the introduction of this new paradigm.

Most of us waited to see how it would be received in the industry, but then – as now – it proved to be a very valuable tool.

And just a few years ago, we were all still discussing the advances in AutoCAD and Civil 3D.  Though we knew these programs would remain relevant, it was evident from all of the different software that interacted inside of Revit and enhanced the user experience that the world of 3D design was here to stay. (As a friend of mine said not long ago, “If you are not designing and interacting in 3D and models, you are quickly going to be obsolete.”)

Autodesk University 2012 showed us how design is being done today and where it is going in the future. One of the more interesting observations was that besides the architects, engineers and designers, there were contracting companies, retail companies and owners all talking about the new Autodesk programs that were being used in the workplace.

There was lots of talk in these groups about building “Revit families” specific to their business types, as well as discussions around how to mix the contractors (who have the knowledge about how a building is built in the actual world) with the BIM modelers so that the models are also constructible.

This will be a big challenge. Contractors and superintendents who know how to pour a slab and build 20-story buildings have knowledge and insight that is absolutely critical to building a proper BIM model.

As any techno geek, I am always very interested in the new products on the exhibition floor and the showcase included hundreds of third-party vendors developing exciting products that work alongside Autodesk.

There were lots of new software and hardware lines in the 3D laser scanning industry, as well as new software offerings for BIM models, Revit technologies and GIS products. But for me, the most intriguing products were related to 3D printing applications.

These fabrication and modeling solutions enable products to be created directly from their computer models.

Almost anything you could imagine – from cars to motors to guitars – was printed and on display. Though 3D printing has been a popular topic in recent years, it was there, it was real, and it will definitely change how items are built in America and around the world.

At the conference in Vegas, there were actual printers producing objects out of wood, metal and polymers. The only difference was whether the printer was loaded with plywood or metal.

BIM is an acronym for Build Information Models, meaning to build computer models that have built-in intelligence. What I observed was BIM in the context above – building models and objects with just the information in a computer.

My, how we have grown.

###

Tate Jones has over 40 years of experience in land and aerial surveying and was one of the country’s earliest adopters of 3D laser scanning technology. A nationally recognized expert in the field of 3D data capture, he has worked with hundreds of clients in the engineering, architectural and construction industries. Contact him at tjones@lasurveying.com or visit www.landairsurveying.com.