3D POINTCLOUD AND CAD DELIVERABLES FAQ
The world of 3D CAD deliverables can be challenging. So, this document is meant to provide basic information about our deliverables. Please feel free to contact us, if you have any questions.
TABLE OF CONTENTS:
- Company Culture and Workflow
- Uses for Pointclouds
- Recommendations for Hardware and Software
- Software for Using and Modeling Pointclouds
- Technical Support, Training, and Online Resources
- Inherent Limitations of 3D Data
- Common Operations to Perform with 3D Deliverables
a) Inserting a Point Cloud into Revit
b) Modeling a Point Cloud in Revit
c) Using a TruView (i.e., spherical photography)
- Company Culture and Workflow
Integrating 3D deliverables into the company workflow involves more than just opening up files. Companies must work together to ensure that the deliverables can be properly and efficiently utilized. Here are some suggestions to ensure success:
- Company-wide Awareness. Buy-in is a BIG part of your early success! At the beginning of the project, have a demonstration for each member of the team who will be working, supervising, selling, or profiting from the project. Show them who and how 3D data will be used and the benefits it has over traditional approaches. This will help manage expectations and hesitations, fostering workflow between groups.
- Assign a member of upper management and a good CAD technician to be the go-to company resources for 3D data. Having good knowledge in these roles will facilitate the company’s ability to implement 3D data company-wide on future projects as well.
- Plan a training budget. There is a learning curve to using laser scans and point cloud data. There are often other advanced tools and techniques that will improve your workflow.
- Continuing Education. Subscribe to Spar Point Group’s free membership plan, which will notify members about upcoming conferences and webinars. Also, consider sending your team to 3D conferences, like Spar Point Group or Hexagon. This will give you the big picture look at how 3D data is being innovated and implemented industrywide. This technology is changing so fast that each year brings new groundbreaking capabilities.
- Uses for Pointclouds
The pointcloud is the fundamental building block of the 3D asbuilt world. Here are products that can be produced from a registered point cloud:
- CAD files – LandAir can produce a CAD file in software such AutoCAD, MicroStation, or Revit for you to compare or create drawings. LandAir can also provide CAD services:
- 2D Plans – The point cloud can be viewed from the top or turned on its side in order to trace 2D CAD lines along desired elements.
- 3D Models – LandAir can provide models in Revit, AutoCAD or MicroStation. Levels of detail can vary from the most simple and affordable geometric shapes to complex geometries that closely approximate the real world.
- Point cloud viewer – The pointcloud delivers excellent asbuilt information, so working in it will provide the best data. Site conditions can be observed, measurements can be taken, and portions of the pointcloud can be exported. Programs like AutoDesk’s ReCap can make pointclouds accessible to all.
- Spherical photography – LandAir can use software such as Leica’s TruView and Faro’s SCENE Webshare to create a world inside which you can view the pointcloud from every scanner setup. You can measure distances between points and angles between surfaces. The files are viewed in a web browser, and thus can be used on almost any computer.
- Clash Detection – Clients’ models can be imported into the point cloud and “clashed” to see if the new model interferes with the existing point cloud.
- Video flythroughs – Videos running through the point cloud are useful to show the client, potential customers, and team members that won’t have access to the software.
- Augmented Reality / Virtual Reality – The visualization industry is advancing rapidly. Pointclouds and model can be inserted into real environments for inspection and manipulation (i.e., augmented reality), or the user can be inserted into the pointcloud/model for observations, measurements, etc. (i.e., virtual reality). There are multiple software packages that can be used for this kind of visualization.
- Hardware and Software Recommendations
- Equipment. The use of 3D data presents unique challenges. The point clouds we produce from our 3D laser scanners can become quite large in size. Therefore, significant computing power is required. LandAir recommends the following minimum or similar requirements for any computer that will use our point clouds:
- CPU – I7-4770K 3.5GHz Quad Core
- Ram – 16 GBs DDR3 1600
- Video Card – Nvidia Quadro K4000 3GB Ram
- Primary Hard Drive – 250 GB SSD
- Secondary Hard Drive – 1 TB SATA 6
- Dual Monitors – All of LandAir’s CAD technicians utilize dual monitors.
- Software. Working with pointclouds and 3D models requires a working knowledge of specialized software (e.g., Revit, Microstation, ReCap). Due to rapid advances in software development, LandAir recommends using the latest version of the available software. Also, additional software packages and plugins may be necessary to utilize the deliverables for a particular purpose. LandAir can provide end user support for an additional fee to help utilize our deliverables.
- Software for Using and Modeling Pointclouds
Along with a robust computer, LandAir recommends choosing software that is designed to accept 3D data. LandAir works most often in AutoCAD, MicroStation, and Revit. However, we can also produce files that can be imported into the vast majority of software platforms on the market (e.g., PDMS, SmartPlant).
It is also very important to upgrade to the latest version of the software, because software prior to 2012 could not handle pointclouds very well. Software companies are making advances every year as their virtual processing engines become better at working with large data sets.
Programs for processing pointclouds and producing CAD models:
- AutoCAD – Autodesk’s flagship CAD program, which can be used for 2D and 3D
- Cyclone – standalone software for point cloud processing and modeling
- Cloudworx – uses the Cyclone engine inside of programs like AutoCAD and Microstation to give modeling and other advanced capabilities
- Microstation – Bentley’s flagship CAD program, which can be used for 2D and 3D
- Revit – Autodesk’s flagship 3D modeling program
- ReCap – Autodesk’s point cloud viewer is free and a very good way to view the pointcloud and make measurements. The “Pro” version has modeling and other tools, but the free viewer will do everything that most companies need, including slicing and dicing the pointcloud. Download here.
Programs that are task-specific or that are plug-in enhancements to other programs:
- AutoDesk Live – visualization software that accepts pointclouds and models to produce a movie-like realistic environments
- 3D Reshaper – software that is very good at matching exact organic shapes from point clouds, e.g., for reverse engineering of mechanics
- Descartes – powerful point cloud modeling tools plug-in for Microstation
- Edgewise by ClearEdge3D – will automatically model basic geometric shapes in pointclouds, which can cut a lot of time out of modeling large or complex projects
- Inventor – designed for smaller-scale object modeling
- LumenRT – visualization software that accepts pointclouds and models to produce a movie-like realistic environments
- Navigator – Bentley’s tool for clash detection, analysis, and simulation
- Navisworks – Autodesk’s tool for clash detection, analysis, and simulation
- Scene Webshare – Faro’s spherical photography viewing and measuring software
- TruView – Leica’s spherical photography viewing and measuring software
- Other – There are many other open source programs are available for unique functions that work with point cloud data.
- Technical Support, Training, and Online Resources
If you require training to get up and running, LandAir can provide a technician for onsite training or recommend a third party training service.
Online resources:
- AutoDesk technical support – http://knowledge.autodesk.com/support
- Bentley technical support – http://selectservices.bentley.com/en-US/
- ClearEdge technical support – http://www.clearedge3d.com/contact-us/
- Faro technical support – http://www.faro.com/en-us/support
- LandAir website – http://www.landairsurveying.com/
- LandAir blog – http://www.landairsurveying.com/blog/
- LandAir Vimeo channel – https://vimeo.com/landairsurveying/videos
- LandAir YouTube channel –https://www.youtube.com/user/LandAirSurveying?feature=watch3
- Leica online classes –https://portal.leicaus.com/hdstraining/virtual classroom schedule.cfm
- Leica technical support – http://www.leica-geosystems.us/en/Technical-Support 54179.htm
- Leica Truview examples – http://www.leica-geosystems.com/en/Leica-TruView-Cyclone-PUBLISHER 64524.htm
- Inherent Limitations of 3D Data
- 3D Laser Scanning. A 3D laser scanner is a line-of-sight optical instrument. It is possible that some objects closer to the scanner will block it from scanning other objects further away, and therefore, these objects or areas may not be shown in the point cloud and may be omitted in our deliverables. Other sources of error can be caused due to site accessibility, onsite interferences and obscurities, or areas with high or low reflectivity or refractivity (e.g., glass, stainless steel, high gloss paints, wet or dark surfaces). Our experience in scanning will help us reduce the data lost for these reasons, but omissions are always a possibility, depending on the real conditions at the time the scans are collected.
- 3D Modeling. 3D modeling is necessarily less accurate than the point cloud. Models do not connect every point collected by our scanners, and thus, true asbuilt information is omitted. Also, best-fit curves, truly vertical/horizontal linework, and modeling families may be used to reduce the scope and expense of the project, which will only approximate the location of certain features. For example, walls, ceilings, and floors could be modeled as one planar surface, losing natural bowing or differences in angles to other features. Similarly, deflections and bowing in piping runs may not be shown in the model. Although the typical accuracy of the model is within approximately one-half inch (1/2”), these limitations could cause features to be modeled with much less accurately or omitted altogether in certain areas.
- Common Operations to Perform with 3D Deliverables
INSERTING A POINT CLOUD INTO REVIT
- Open the Revit Project.
- Insert Tab > Link Panel > Point Cloud (see below)
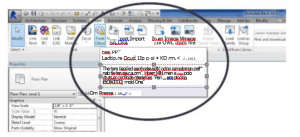
3. Specify the file or files to link. It must be one of the following types of files: Point Cloud Project (.rcp):Point Clouds (.rcs):
4. For positioning, select “Auto – Origin to Origin”, unless you are specified to to set up the model differently.
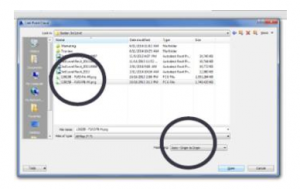
5. “Open”.
6. Begin to use the point cloud in Revit as you want. The point cloud will be visible in all
views except drafting and schedule views.
*Some text was taken from www.help.autodesk.com. Please see site for more information.
MODELING FROM A POINT CLOUD IN REVIT
- Start in Plan View to get the elevation tags and scope boxes in approximation to the point cloud.
- In order to best set up Level Datums, cut a longitudnal section through each part of the building(s) that need datums. Because the point cloud shows real life data, the floor will not be level as you will see in the section view. Determine an approximate mean level of the floor and set each level.
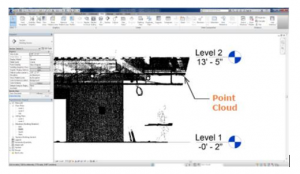
3. Once the levels are set up, walls can be modeled in plan Walls faces can be determined by where the density of points is thickest (see below). (Make sure that the plan view is cut at a level that best reflects the wall thickness. (i.e. If your plan is cutting through a base, you will model a thicker wall than necessary.))

4. Windows, Storefronts, Wall Trim, etc can then be modeled using a combination of plan
views, section views and elevation views. In addition to using many views in Revit to
help decifer the point cloud, a TruView application proves very beneficial to the modeling
process.
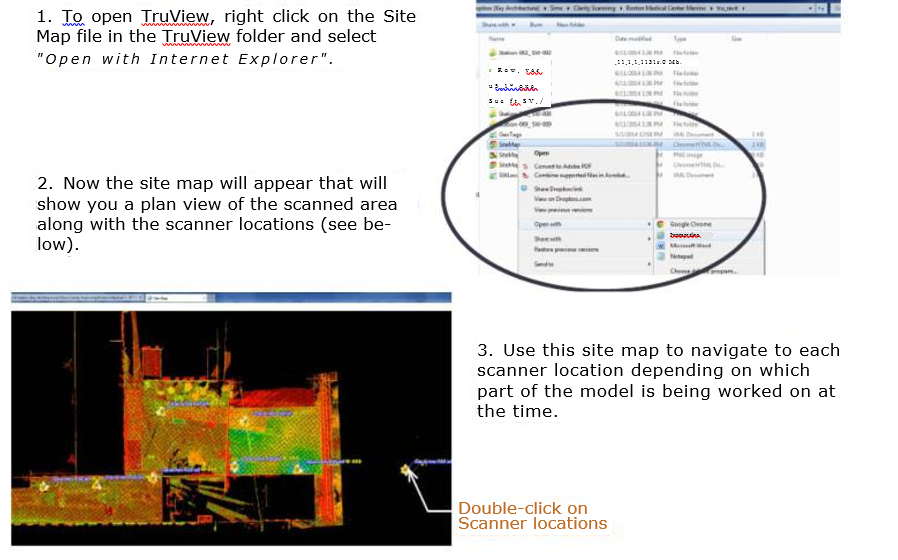
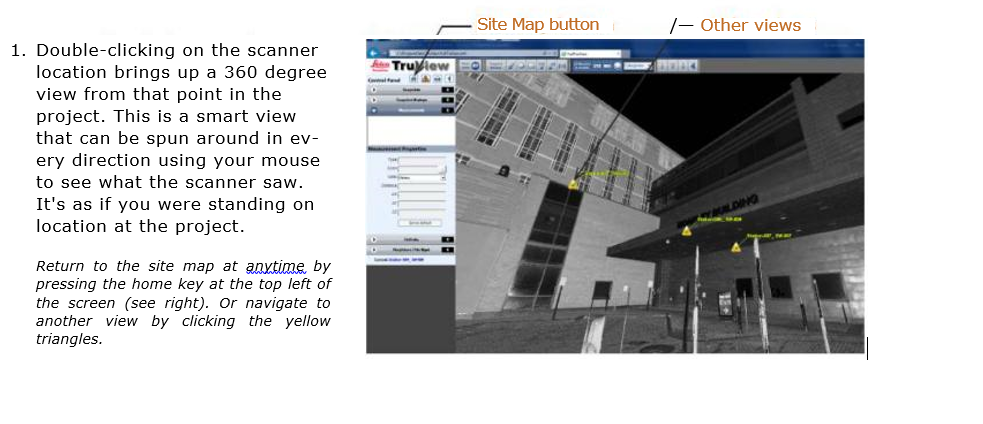
USING A TRUVIEW AS A REFERENCE TOOL
TruViev., can be a very helpful tool when trying to understand a point cloud in Revit. Hav-
ing a TruView up on an additional screen provides a great road map as you model.
You can download the application by going to Leica’s website at http://hds.leica-geosystems.com.